


Board Hub

Think of all the manual administrative tasks involved in managing board meetings. All the documents and approvals and signatures. Automate it all.
This product is built inside of SharePoint and takes care of all the admin work.
Introduction
A podcast episode will be made on the principals around managing board meetings and how to most effectively do it regardless of technology.
Experiences
Below are videos showing the experience of Board Hub from the perspective of the user and admin.User experience
Admin experience
Installation
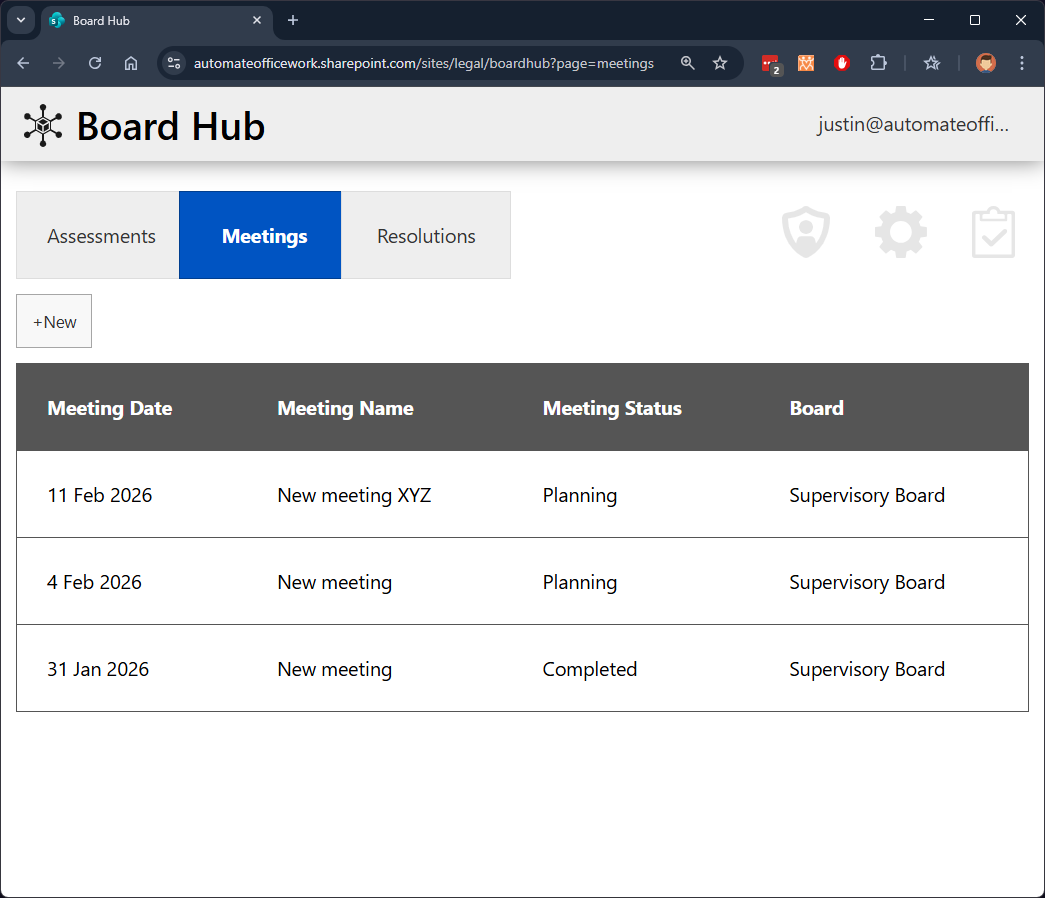
The final product when installed looks like this.
Server Installation
Server installation has not yet been developed.
Server installation places a "skeleton" web part into your SharePoint tenant which you can then place on SharePoint pages. This web part then calls to the Automate Office Work server to get the current logic for the web part and to check your license. This means we can constantly improve and develop the web part to make it better for you. This method of installation requires an extra licensing step. All other data is stored in your local SharePoint tenant.
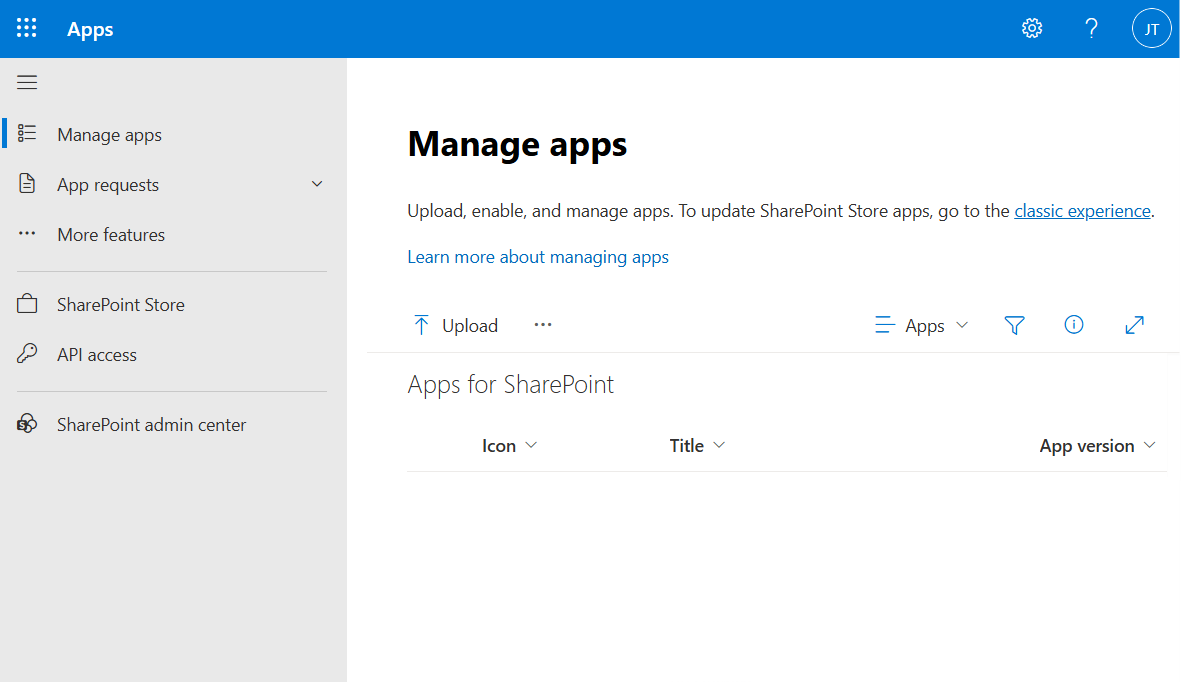
Your SharePoint admin, usually someone in IT, will need to install the web part in your SharePoint tenant. They can generally do this at https://[your_tenant].sharepoint.com/sites/appcatalog/_layouts/15/tenantAppCatalog.aspx/manageApps. Below shows where the SharePoint admin installs the web part by clicking on "Upload" or dragging the file to the screen. The admin is asked to confirm whether they want to install the web part and whether they wish to install it for the entire tenant (making it available as a web part for everyone editing SharePoint pages) or if it should be installed on one SharePoint at a time (requiring each SharePoint owner to install the web part for their own SharePoint site).
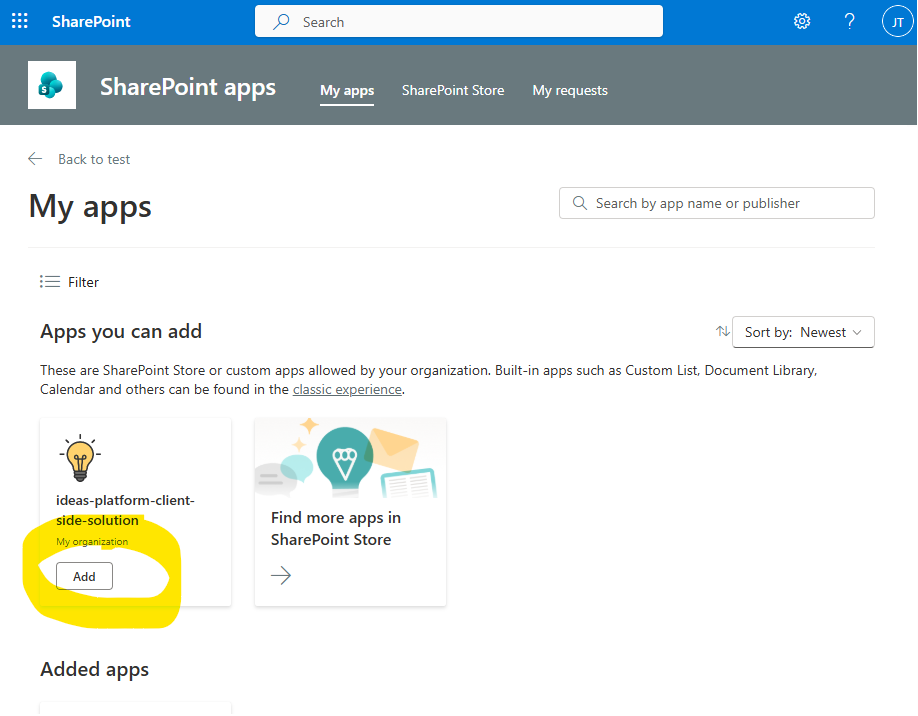
Once the web part is installed by your SharePoint admin, if they did not install the web part for the entire tenant, an owner of your SharePoint site must make it available to use. A SharePoint owner can do this at the home page of your SharePoint. Click on +New > App. The "My apps" page is shown below. The new web part should be listed under "Apps you can add". Click "Add" to add it. If you do not see it listed, look under the "Added apps" section in case it was already added.

Once available for your SharePoint, the web part should be available to use when editing a SharePoint page. See the Create a SharePoint Page section for next steps then come back here for further instructions.
Further Instructions
Once the page is created with the web part properly added to the page, you should now see the below screen for install.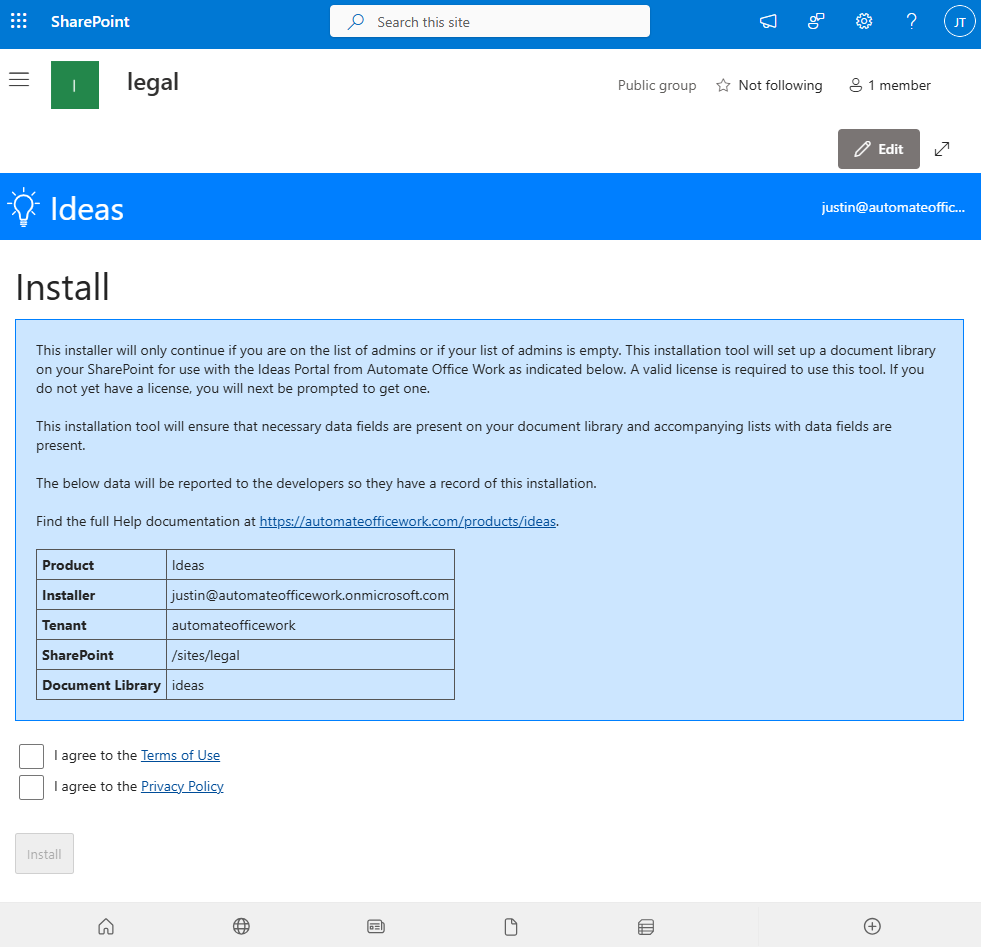
The page explains how installation will go. It will create the document library indicated if not already created. It will set up all necessary data fields in the document library. And it will create associated lists. The five data points will be reported to Automate Office Work so we have a record of the installation. You must agree to the Terms of Use and Privacy Policy in order to go forward. You should see comments on your screen as the installation proceeds. If there is an error you must correct the error. Once installation is successful, you are directed to the home screen.
Licensing
Server installation requires you to have a valid license to use the solution. If you do not have a valid license you are redirected to the License page. You can apply for a free trial license if it has not already been applied in the past. You can purchase a standard license or apply a code for another license. Alternatively, reach out or have your consultant reach out to contact@automateofficework.com to arrange an alternative license.Below this is a table with your license history where you can see your past licenses.
Once you have a valid license, you will be able to go to the home page. Installation and setup are complete! Go to the Admin page to customize everything that you would like.
On-Prem Installation
On-Prem installation places all the logic of the web part locally into your SharePoint tenant. The web part makes no calls to the Automate Office Work server. This means we cannot access the code to make future updates. This method of installation has no extra licensing step. Once you buy this version of the web part, it is yours forever. If you would like customization to fit your exact needs, we can do it and then deliver the full set of code to you.The first thing to do is to get your copy of the board_hub_install.zip file. Reach out to contact@automateofficework.com to work out a payment plan and customization options. It contains the below folders and files. Note: the exact files and folders may differ as the product develops over time.
.
├── admin.html
├── aowgeneralapp.sppkg
├── assessment.html
├── assessments.html
├── batchemails.json
├── header.html
├── help.html
├── install.html
├── javascript.js
├── meeting.html
├── meetings.html
├── readme.txt   [includes installation instructions]
├── resolution.html
├── resolutions.html
├── settings.html
├── settings.json
├── tasks.html
├── flows
│   ├── ideas_daily_digest_emails.zip
│   ├── ideas_daily_digest_emails.zip
│   └── site_errors_send_emails.zip
├── folders
│   └── 1
│       └── 1
├── images
│   ├── emailbanner.txt
│   ├── fountain.gif
│   ├── logo.txt
│   ├── icons
│   │   ├── administrator.svg
│   │   ├── adobesign.svg
│   │   ├── clock.svg
│   │   ├── docusign.svg
│   │   ├── download.svg
│   │   ├── envelope.svg
│   │   ├── gear.svg
│   │   ├── paperairplane.svg
│   │   ├── tasks.svg
│   │   └── upload.svg
│   └── spicons
│        ├── audio.svg
│        ├── csv.svg
│        ├── docx.svg
│        ├── email.svg
│        ├── genericfile.svg
│        ├── html.svg
│        ├── link.svg
│        ├── pdf.svg
│        ├── photo.svg
│        ├── pptx.svg
│        ├── rtf.svg
│        ├── txt.svg
│        ├── xlsx.svg
│        └── zip.svg
└── portal
    ├── header.html
    ├── logo.svg
    ├── menu.html
    └── waffle.svg
Installing the AOW General App SharePoint Web Part
First we need to install the web part found in the zip file as aowgeneralapp.sppkg. This needs to be installed on your SharePoint tenant by a SharePoint administrator. This is usually someone in IT in your organization. They can generally do this at https://[your_tenant].sharepoint.com/sites/appcatalog/_layouts/15/tenantAppCatalog.aspx/manageApps. Below shows where the SharePoint admin installs the web part by clicking on "Upload" or dragging the file to the screen. The admin is asked to confirm whether they want to install the web part and whether they wish to install it for the entire tenant (making it available as a web part for everyone editing SharePoint pages) or if it should be installed on one SharePoint at a time (requiring each SharePoint owner to install the web part for their own SharePoint site).

An article describing the installation process for the Web Part can be found at https://automateofficework.com/products/sharepoint.
Your SharePoint admin had the option of installing the web part on all SharePoint sites. If they did this, then you have nothing more to do. You can simply start editing a page and the web part appears in the list of web parts.
If your admin did NOT make the web part available to all SharePoint sites, a SharePoint owner must add it to each SharePoint site. Go to the home page of your SharePoint. Click +New > App. On this page is a list of Apps you can add. Add the AOW General App if it's not already added. It's now on your SharePoint's list of web parts when editing a page.
Creating a Document Library
Next you need to create a document library. You must first have a SharePoint and you must have owner rights to the SharePoint. Go to your SharePoint. For example: /sites/legal. Go to the Site Contents and create a document library. For example: 'boardhub'. For On-Prem installation, go into your new document library and copy the contents of the board_hub_install.zip folder. You need everything except the aowgeneralapp.sppkg. When done it should look like this:

Files and folders copied into a document library called 'boardhub' on a SharePoint at /sites/legal
Placing Board Hub on your SharePoint page
Once your SharePoint admin installs the web part as described above, you can now create a page on a SharePoint where you have contributor rights. Create the page according to the instructions at Create a SharePoint Page then come back here for further instructions.
Further Instructions
Once the page is created with the web part properly added to the page, you should now see the below screen to install Board Hub.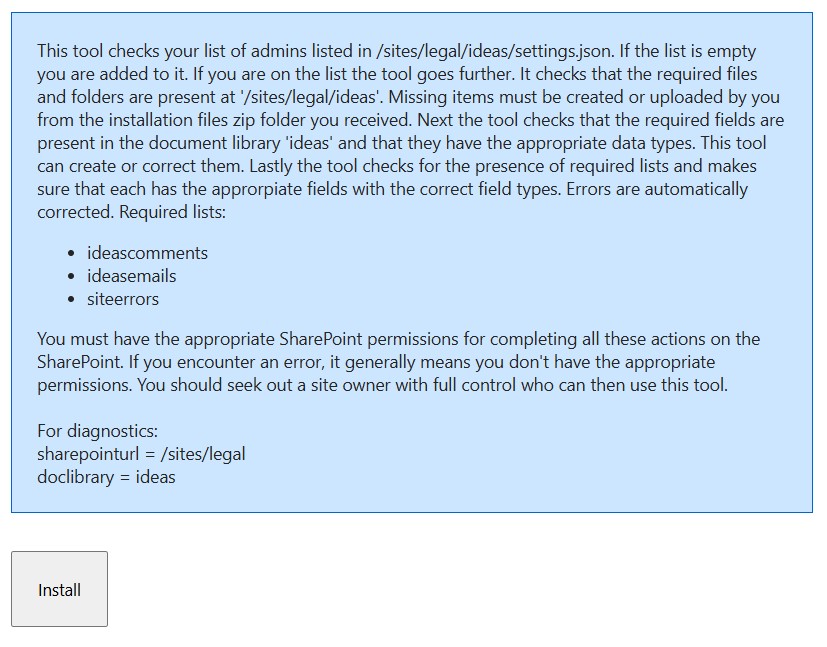
Click Install. It will set up everything for you. It creates the supporting SharePoint lists and adds the correct data columns for the document library and lists. It takes a few seconds to run, but in the end you should see a success message and a link to go to the Admin page to finish setting things up as you would like.
Create a SharePoint Page
All SharePoint solutions must be contained in a web part. And all web parts must be contained in a SharePoint page. There are two ways to create SharePoint pages and each results in a slightly different URL. On my SharePoint, I can create pages that result in the below different URLs:
- https://automateofficework.sharepoint.com/sites/legal/boardhub
- https://automateofficework.sharepoint.com/sites/legal/SitePages/boardhub.aspx
You could actually create pages at both places, but for consistent communication I recommend you choose one way.
Option 1
The first way is actually a little more complex, but results in a nicer, cleaner URL. We will create a page in a document library of our choosing. The document library must already exist.First go to your Site Contents. Find a Page Library called Site Pages. Click on it. At the top click +New > Web Part Page. Give it the name default.aspx. Under Choose a Layout Template select 'Full Page, Vertical'. In the Document Library drop-down select the document library you created. For example: 'boardhub'. Click Create.
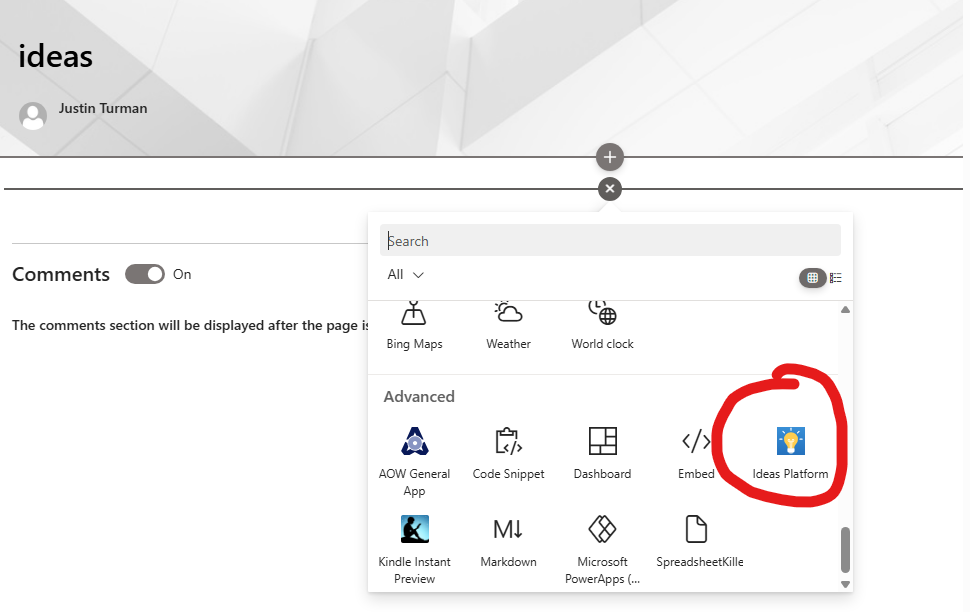
On the Page Editor click "Add a Web Part" in the middle of the screen. In the menu above, under Categories click on the 'Advanced' folder. In the Parts panel on the right you should have the solution web part selected (Board Hub for Server installation; AOW General App for On-Prem). Click on it if it's not selected. Click the 'Add' button to the bottom right. Wait a couple seconds.
For Server installation, in the middle of the page under "Add a Web Part" you now have a box that says "Board Hub. SharePoint URL cannot be blank or /sites/... Edit web part properties." We need to point to the correct SharePoint and document library. Hover over this new box and click on the down arrow that appears in the top right corner of the box. In the menu that appears select Edit Web Part. Click the Configure button. In the right panel fill in the URL for your SharePoint like https://[tenant].SharePoint.com/sites/[my_sharepoint]. For example: https://automateofficework.sharepoint.com/sites/legal/. Fill in the URL of your document library you wish to use. Don't worry if it doesn't exist yet. This is a document library that will store all the user generated data for meetings. It can be different from the document library that will hold your SharePoint page. Or they can be the same document library. It's up to you. I usually use the same document library for database and interface. The install process will create the document library you indicate here later if it doesn't already exist. For example: "boardhub". Click the "Apply" button at the bottom of the right panel. The main page will fill in with content from the platform. Click the X in the top right corner of the right panel to close the right panel. Click the OK button in the 'Configure web part' panel on the right. Remove the question mark from the URL and everything after it like ?pageview=shared&initialtabid=ribbon.webpartpage&visibilitycontext=wsswebpartpage and refresh the page.
For On-Prem installation, in the middle of the page under "Add a Web Part" you now have a box that says "AOW General App. Invalid JavaScript File URL." We need to point to the correct JavaScript File URL. Hover over this new box and click on the down arrow that appears in the top right corner of the box. In the menu that appears select Edit Web Part. Click the Configure button. In the right panel fill in the JavaScript File URL. For example: https://automateofficework.sharepoint.com/sites/legal/boardhub/javascript.js. The portion before sharepoint.com will need to match the SharePoint tenant for your organization. /sites/legal will need to match for your SharePoint. And replace 'boardhub' with the URL of your document library. Click the "Apply" button at the bottom of the right panel. The main page will fill in with content from the portal. Click the X in the top right corner of the right panel to close the right panel. Click the OK button in the 'Configure web part' panel on the right. Remove the question mark from the URL and everything after it like ?pageview=shared&initialtabid=ribbon.webpartpage&visibilitycontext=wsswebpartpage and refresh the page.
You may notice that SharePoint creates a file default.aspx in your document library folder. This makes it so you can go to your document library's folder's URL in a browser and it will show you the page. Do not ever delete or edit this file.
Option 2
The other way to create a SharePoint page is from the SharePoint home page. Click +New near the top middle of the home screen. Select Page. If you do not see this option, or you click it and don't see the option for a "full-page app" you can try the URL at https://[tenant].sharepoint.com/sites/[my_sharepoint]/_layouts/15/createpagefromtemplate.aspx. Under the Full-page apps section select the web part to use on the new page. This "full-page app" makes it so only a single web part can be used on a SharePoint page. We recommend this way so there will be no other web parts on the page. Board Hub is designed to take up the entire contents of your page. This also prevents you from adding the web part multiple times on a page, which can result in errors.
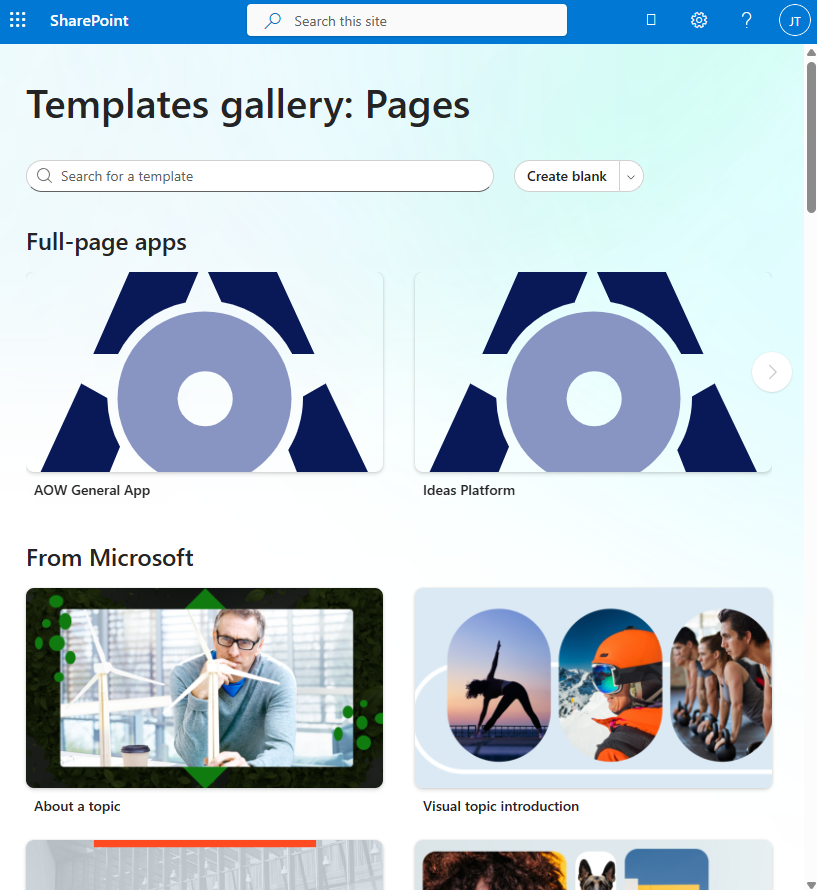
Microsoft changes the Create Page page from time to time. Currently there is a category called "Full-page apps" and Board Hub for Server installation or AOW General App for On-Prem installation is listed there. In an older version there were tabs along the top. You had to select "Web part page" and select the web part. No matter how you find it, select the web part. Microsoft changes the next steps from time to time, but currently you should see a panel on the left and the contents of the web part taking up the right part of the page which should show an error telling you we need to indicate some URLs. Click "Use this template". Give your page a title. I recommend giving it a simple title consisting of one word and all small letters at first. The first time you save this page the title will become its url. So if you give it the title 'boardhub' the URL will be at /sites/[my_sharepoint]/SitePages/boardhub.aspx.
Untick the box to "Show in site navigation" unless you really want it to appear there.
Click "Save" to save the page. The page will redirect to the URL created for the page using the page name. Click "Edit".
Click "Save" to save the page. The page will redirect to the URL created for the page using the page name. Click "Edit".
For Server installation, put in the address to your SharePoint like /sites/[my_sharepoint]. For example: /sites/legal. Then put in the URL of your document library that you would like to use to store data generated by users. Don't worry if it doesn't exist yet. The install process will create it if it doesn't yet exist. For example: "boardhub". Click the "Save" button to save the page. Click "Apply" at the bottom. Continue with the installation instructions for Server installation.
For On-Prem installation, put in the URL to the JavaScript file in the document library where you uploaded the batch of files from the ZIP folder, like https:[tenant].sharepoint.com/sites/[my_sharepoint]/[document_library]/javascript.js. For example: https://automateofficework.sharepoint.com/sites/legal/boardhub/javascript.js. Click the Apply button. You see the page content area filled in with content from the app. Click the Save button. By default the web part says "SharePoint URL cannot be blank or /sites/... Edit web part properties". We need to edit the web part to point it to where Board Hub data will be stored. Click on the "Edit properties" icon above the web part and the right panel opens. In SharePoint we can separate interface from database. This means the page showing Board Hub can be on a separate SharePoint from where the meeting data is stored. So put in the URL pointing to your SharePoint after the sharepoint.com. These typically start with /sites/ and end with the name of your SharePoint. So a full URL might be something like /sites/legal. This must be a SharePoint that you have ownership rights to in order to install a document library. Next we need the URL to your document library on that SharePoint that contains all the files that we copied from the ZIP file earlier. If the SharePoint and document library are both valid, you should be redirected to an Install screen. Continue with the installation instructions for On-Prem installation.
Admin
The person who installs Board Hub is automatically a global admin. From the home page there is an Admin icon you can click to go to the Admin page. There are several things you can customize on the Admin page. You can manage the list of admins (but you can't delete yourself). You can change the name and logo of the platform. You can change the color. You can darken the color. You can indicate that text on the dark color should be white to make it more visible. You can hide and unhide the normal SharePoint banner.
The default logo is used. You can upload a new logo.
The Page URL is the URL that is used in emails to invite users to Board Hub. It's possible to have the portal reflected to multiple pages. But when emails are sent we need to tell the system exactly which page to send users to. By default we use the URL of the page where you installed Board Hub.
For those using the Server installation, emails can come from notifications@automateofficework.com if you would prefer. And error notifications can be sent to Automate Office Work so we can improve the solution automatically for you. Feel free to email feature requests.
For those using the On-Prem installation, you will need to set up emails yourself and email contact@automateofficework.com in case there are errors. Feel free to email feature requests. We will need to arrange for updates.
Lastly, you can change the textual messages that appear throughout the platform. To the point that you could actually translate the entire thing into another language.
Conclusion
There is so much manual admin work around board meetings. This work is highly unique to each organization. It is ripe for automating. Board Hub frees you from all the administrative work so you can focus on the strategy to lead your organization.